Microsoft Word's Mail Merge feature offers the ability to prepare both emails or letters, allowing you to create documents that are both personalised and produced en masse. It is a simple and straightforward method to send communications out without the need for a third party application or subscription.
In this guide we will walk you through how to create a mail merge document in Microsoft Word that you can them email through Outlook, or
simply print out and send.
What is Mail Merge?
Mail Merge is a powerful feature in Microsoft Word that enables users to craft a single document template that can be automatically filled with individual data from a data source, such as a spreadsheet or database. This is particularly useful for generating large quantities of documents, like emails, letters, labels, or envelopes, personalised for each recipient.
Step 1: Prepare Your Data Source
Before you begin the Mail Merge process, you need a data source. This is typically an Excel spreadsheet containing all the data you want to include in your document. Each column in your spreadsheet should represent a different field you want to merge (e.g., First Name, Last Name, Address, etc.), and each row should contain the data for one recipient.
Example of a data source structure:

Ensure your data source is saved and closed before starting the Mail Merge in Word.
Step 2: Start the Mail Merge
Open Microsoft Word and start with a blank document, which will serve as your template for the merge. Follow these steps:
- Go to the 'Mailings' tab.
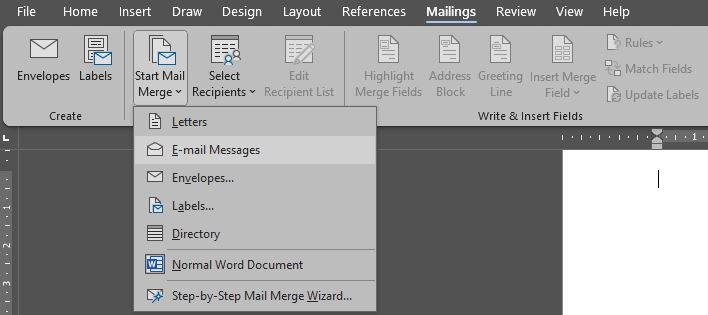
- Click on 'Start Mail Merge', and a dropdown menu will appear.
- Select the type of document you want to create (e.g., Letters, E-mails, Envelopes).

- Click on 'Select Recipients' and choose 'Use an Existing List'. Then, browse to your data source file and select it.
- If you don't have an Excel spreadsheet ready with your recipients details you can manually type them in by choosing Type a New List

Step 3: Insert Merge Fields
Once your data source is connected, you can start inserting merge fields into your Word document:
- Place your cursor where you want a field to appear in the document.
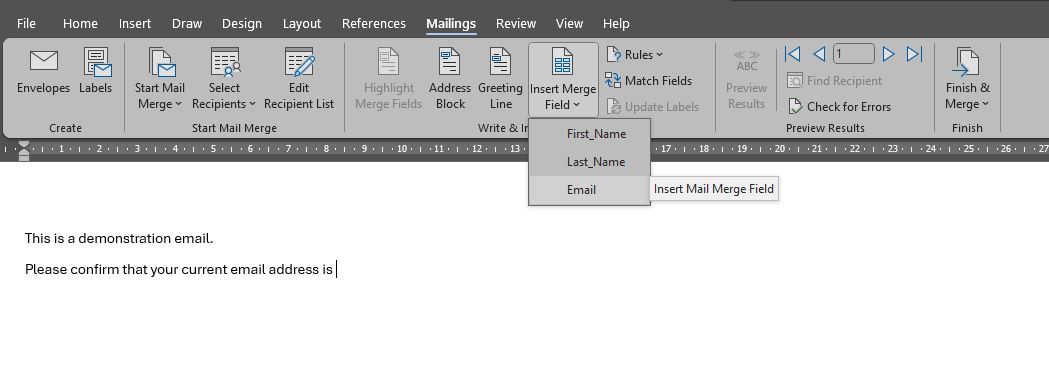
- Click on 'Insert Merge Field'.
- A dropdown will show the field names from your data source (e.g., First_Name, Last_Name). Click on a field name to insert it.
Repeat this process for all fields you need in your document.

Step 4: Preview and Finish the Merge
To see how your document will look with the actual data:
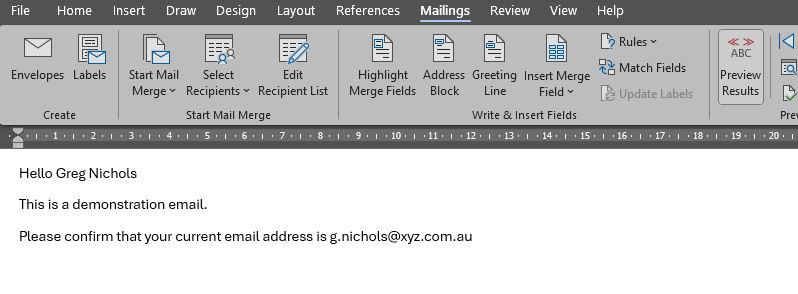
- Click on 'Preview Results' in the Mailings tab.
- Use the left and right arrows in the Mailings tab to scroll through different records to see each personalised document.

When you’re satisfied with the preview:
- Click on 'Finish & Merge'.
- Choose 'Print Documents' for physical copies or 'Send E-mail Messages' if you are sending emails. For emails, you will need to specify which field contains the email addresses and you can also add your own subject line.

Step 5: Save and Manage Your Document
Save your Word template for future use. You can re-use the same template for other Mail Merge projects by simply attaching a new data source.
Conclusion
Mail Merge in Microsoft Word is a versatile tool that can significantly enhance your business communications. By utilising the Mail Merge features within Microsoft Word you can send out personalised emails through Outlook without spending hours copying and pasting or forwarding the same content to different recipients.